Beam and Raster Checkout for A1n/d2n (Long Procedure)
From HallCWiki
Jump to navigationJump to searchEstablish beam in the hall
 Goals
 - Using "Target Out" location, make sure beam reaches beam dump without hitting anything.
Initial Raster checks
- Follow https://hallcweb.jlab.org/wiki/index.php/Beam_and_Raster_Checkout_for_A1n/d2n_(Short_Procedure)#Initial_Raster_checks
Bull's Eye Scan: BPM and Raster Calibration
Bull's Eye Scan Main Page Bull's Eye Scan: BPM vs Harp scan Calibration
 Goals
 We want to be able to correlate the BPM ADC data with the "absolute"
 positions given by the surveyed Harp scanners for these nominal BPM
 positions:
  (0, 0), (+2,+2), (+2,-2), (-2,+2), (-2,-2)
NOTE: The positions above can be experiment specific. Confirm with RC.
Procedure
Starting Settings
 Beam:           5uA CW,  Raster OFF
 Beam Position:  (0, 0)
 Target:         Carbon or 'No Target'
 Have a stripchart of the 3HO4A, 3HO4B, and 3HO4C BPMs visible.  [Run go_beam_stripchart, if needed.]
Start an HCLOG entry titled 'BPM calibration' and record the following for each of the 5 (x, y) points above
- Requested Beam Position
- HMS/SHMS Run numbers
- Harp Scan log entries
For each of the 5 points identified above, do the following
- We want all BPMs to have (roughly) the same values for each point (so the beam is roughly parallel to the beamline). Tolerances of +-0.3 or so on the requested numbers are fine.
- Be sure the BPMs and beam are stable, start a CODA in each arm for a few minutes, then call MCC and request that they run and log a harp scan for both 3H07A and 3H07B to the HCLOG.
Just leave the CODA run going during the scans.
Submit your HCLOG summary table
- Make sure your table is complete
- Add a screen snapshot of the BPM stripchart
Harp scans
- Follow https://hallcweb.jlab.org/wiki/index.php/Beam_and_Raster_Checkout_for_A1n/d2n_(Short_Procedure)#Harp_scans
Target/Beam centering, Raster checkout
 Goals
 - Establish nominal beam position on target, check/confirm raster size
 Setup
 - Beam Current:   5-10 uA CW
 - Target:         Double Carbon Hole
 - HMS setting: check run plan
 - SHMS setting: check run plan
 Procedure
 - Note:  DAQs should be running and double carbon hole target is in place
 - Online shift crew will proceed with program below.
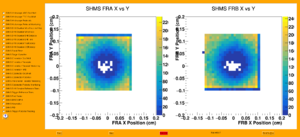
 - Image Carbon Hole target using Raster current pickoffs vs. raw trigger rates in SHMS and/or HMS
 - Target:    Double Carbon Hole
 - Current:   5 uA CW
 - Raster:    5mm diameter
 - Run DAQ on SHMS / HMS
 - Set PS1=0 and all other PS=-1 to ensure DAQ is dominated by scintillator triggers (i.e. "3scintillators out of 4" or "3/4" triggers)
 - Run the online analyzer and look at the 'Fast Raster' panel of the online GUI:
 - Locate the hole in the 2D intensity histogram. A rough z cut should be included in the script to show up- and down-stream carbon hole separately.
 - NOTE: if the beam energy in standard.kinematics is not up to date, the distance scale on the 2D histogram will be wrong
 - Center Beam on using Double-Carbon-Hole Target:
     - Iterate until the hole is clear, and is centered in the circular raster pattern for both up- and down-stream carbon foils
       - Adjust beam position
       - Re-run the online analzyer on the new file(s) to see the effect of a raster size change and/or beam position change.  Make sure changes are logged in the CODA start-run entries!
 - Estimate raster dimensions against Carbon Hole diameter (known to be 1mm).
- Make sure we run at 5uA CW and run harp scan on target girder and verify width of the harp is consistent with 5mm diameter raster setup.
