Beam and Raster Checkout for A1n/d2n (Short Procedure)
From HallCWiki
When should we do a short beam checkout?
 - After beam studies.
 - If for some reason the accelerator has been down for a "significant"
   period of time (say more than ~8 hours).
 - If anything "significant" has changed in the beam line and you are
   not sure if it will affect the position or profile of the beam
   delivered to the hall.
Establish beam in the hall
 Goals
 - Using "Target Out" location, tuned beam only, make sure beam reaches beam dump without hitting anything.
Stripcharts
- You should monitor the beam position, mode, and current during this process.
- Open a terminal and run go_beam_recovery_stripcharts. You should see something like the image to the right.
- The first set of 4 charts are the field integrals of the orbit lock corrector magnets.
- If they are operating properly, you should see the value changing when the beam is on. This means they are properly keeping the beam in the position we want.
- These will flatline when the beam trips. This is normal behavior.
- The second set of charts are beam positions at harps 3H07A and 3H07C. These positions (set by the corrector magnets) should match the nominal values on the wall screen.
- The third set of charts are BCM current and Hall C beam mode, which indicates what type of beam MCC is sending. You should monitor both.
- Mode 2 is tune beam (beam with a 1.5% duty factor used when first checking the orbit and sending beam to the hall).
- Mode 3 is CW
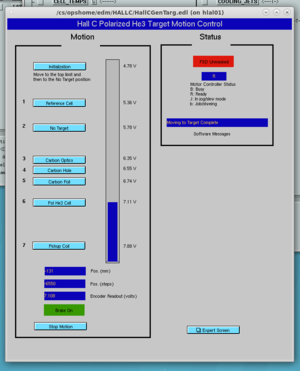
- The last plot is the target ladder position in volts.
- This readout matches the voltages displayed on the target motion control GUI.
- The two values shown here, 7.88V and 7.11V, correspond to No Target and Pol He3 Cell respectively.
Harp scans
 Goals
 - Verify operation of Harp scanners w/ beam.
 - Establish acceptable beam profile.
 Note
 - We need sigma=100–500um at the target
 - If sigma is larger than 500um, ask MCC to tune beam.
 - Once sigma reaches below 500um, call RC for advice on whether we should accept the beam.
 Setup
 - Beam Current:   5 uA CW
 - Target:         No Target
 - Raster:         Off
 Procedure
 1) Verify that the raster is OFF
 2) Ask MCC for harp scans with IHA3H07A and IHA3H07B
 3) Verify beam profile:
   i  ) Find the harp scans on the Ops ELOG. They should be titled "HarpFitter: IHA3H07A" and "HarpFitter: IHA3H07B"
   ii ) On a counting house desktop, run `harp_project_to_target`
   iii) Enter the sigma values from peak 2 and peak 3 of both harp scans
   iv ) The script will project the width to the target and suggest an appropriate raster diameter to request from MCC
   v  ) Confirm with the RC that this value makes sense.
 If you'd like to verify the projection script's arithmetic, you can use the distances in Dave Gaskell's comment
 on this log entry.
 https://logbooks.jlab.org/entry/3764458

 The script's repository has a longer discussion of projecting the width from the harps to the target.
 https://github.com/johnmatter/harp_scan_projection
Initial Raster check with YAG Viewer
 Goals
 - Establish beam to be roughly centered in beam pipe by locating it on YAG viewer just upstream of target.
 - Turn on Raster and verify beam profile expands as expected.
 - No CW beam should be allowed in the Hall until this step is completed.

 Setup
 - Beam Current:   Tune Beam (Viewer limited)
 - Target:         No Target
 - Raster:         Off; 5mm diameter
 Procedure
 1) Call MCC to insert YAG viewer on Hall C superharp girder.
 2) Start with raster off. MCC should post a picture. Verify the beam spot is roughly centered.
 3) If the beam energy has changed, check that on the Hall C Raster Control GUI it is initialized for the correct beam energy.
 4) Request raster on with the diameter determined from the harp scans.
 5) Ask MCC to post a video of the viewer. It should show beam spot on viewer expanding larger than raster off case, and the beam spot size should show a breathing pattern.
 6) MCC will retract viewer after check is done.
 - An example of what to look for can be found in https://logbooks.jlab.org/entry/3764451
 - Another example posted in elog: https://logbooks.jlab.org/entry/3768480
 - Here is an example of how to interpret the images on the YAG viewer: https://logbooks.jlab.org/entry/3749551 (taken during initial beam checkout in December 2019).
Check Beam Positions
 Goal
 - Do this if nominal beam positions are already established.
 Setup
 - Beam Current:   5 uA CW
 - Target:         No Target
 Procedure
 1) With "No Target" position, ask MCC for 5uA CW and verify beam position with established nominal position
 2) In the orbit locks' "Expanded View" window, verify that the values in the light blue boxes match the nominal positions.

 If you can't find the orbit lock expanded view, do the following:
 1) Search for "orbit" in jmenu, and select "Orbit Locks Expanded View" from the drop down menu
 2) Find the row labeled "HallCOrb" (this box should be green!)
 3) Click the far right button labeled "Other", and select "HallCOrb Corrector and Bpm Info" from the drop down menu
 4) Verify that the values in the light blue boxes match the nominal positions.
 As of January 26th, 2020, the positions should look like this log entry.
 https://logbooks.jlab.org/entry/3768504
Target/Beam centering, Raster checkout
 Goals
 - Establish beam position on target, check/confirm raster size
 - This step is optional, consult RC whether we need to do this.
 Procedure
 - see https://hallcweb.jlab.org/wiki/index.php/Beam_and_Raster_Checkout_for_A1n/d2n_(Long_Procedure)#Target.2FBeam_centering.2C_Raster_checkout

