Pion-LT analysis instructions
From HallCWiki
If you have any questions or comments, please email - sjdkay@jlab.org, heinricn@jlab.org, jmurphy@jlab.org or junaid@jlab.org
- We would like the detector check replay to be done on first 50,000 events of every run, and compare plots with the standard ones in the binder. In addition, we want physics replay to be done on every run in its entirety. π+ plots such as missing mass, t, W , Q^2 and φ should be checked for anomalies. Replay instructions are below.
- Do not start the full analysis until after the run ends!
- Keep the file standard.kinematics up to date with the spectrometer settings for every configuration, so that the physics replay generates meaningful quantities. Use the beam energy determined from the arc measurement in the file, and the spectrometer angles from the TV.
- Shift leaders are asked to keep a running total of the number of e − π coincidence events falling within the missing mass and fiducial volume cuts set in the physics replay kumac, so that we can better estimate when to move to the next setting.
TLDR - Quick Start
- ssh cdaql2
- cdaql1 and cdaql3 are also available, try not to use the same machine all the time
- go_analysis
- Do a 50k replay for each arm as soon as you get 50k events
- ./run_coin_hms.sh
- Execute the HMS 50k replay on the latest run
- ./run_coin_shms.sh
- Execute the SHMS 50k replay on the latest run
- Execute the main analysis script after the run is over
- ./run_pionLT.sh
- Execute the main analysis script
- Follow the prompts, provide the required arguments
Notes on the 50k Replay
- By default, the hms and shms 50k replay scripts process the first 50k events from the most recent .dat file
- You can run more events or process a different run number if needed by providing different arguments
- To process a different run number -
- Provide a run number as an argument, for example, to process run 12384 through the HMS -
- ./run_coin_hms.sh 12834
- Provide a run number as an argument, for example, to process run 12384 through the HMS -
- To process more events -
- Provide the run number and number of events you want to process, for example -
- ./run_coin_hms.sh 12834 100000
- Would process 100k events for run 12834 on the HMS
- Provide the run number and number of events you want to process, for example -
- When processing carbon hole runs, you may wish to run more than 50k events
Carbon Hole Runs
- See the instructions on the beam checkout page
- Broad instructions are included below
- Adjust the prescale settings accordingly, set a target rate of ~1kHz for the HMS and SHMS 3/4 triggers (PS1 and PS3)
- The rates you'll see will depend heavily upon setting, the step above is just to get reasonable rates to disc
- Once the prescale values are set, start a run
- When you have 50-100k events, run a HMS and SHMS 50k
- Check the HMS/SHMS Fast Raster page of the output plots, check the hole position. If it looks off, ask MCC to adjust the position.
- You will need to stop and start a new run when they adjust the position
- This may take some trial and error to correctly centre the beam
- You can also try running more than 50k events in the replay if needed (see above)
- More information is located here
Detailed Online Analysis Instructions
- The analysis instructions below assume that you are logged in as cdaq on cdaql2 and are in the folder /home/cdaq/hallc-online/hallc_replay_lt
- If are not logged into cdaql2 as cdaq, then from any HCDESK machine, open a terminal and do the following -
- ssh cdaql2
- cdaql1 and cdaql3 are also available, try not to use the same machine all the time
- go_analysis
- ssh cdaql2
- This will setup the analysis environment and take you to /home/cdaq/hallc-online/hallc_replay_lt, do not type go_analysis as a means to return to that folder
Each new kinematic setting
- Every time you move to a new kinematic setting you must also adjust some things to get the analysis working
- You must edit the file standard.kinematics in the DBASE/COIN subdirectory to add the current kinematic information.
- Go to the last block in the file, leave a blank line and then copy and paste the block below itself, you must leave a blank line in between each kinematic setting
- An example of how this should look after you've pasted in the new block can be seen below -
- Edit the run number range of the two blocks, use 99999 if the run is ongoing
- Remember to edit the run number range of the previous block too
- Next, enter the beam energy determined from the arc measurement, the target mass in amu (available at the top of the file), and the spectrometer angles from the TV.
- The HMS angle (htheta) should be entered as negative and the SHMS angle (ptheta) should be entered as positive
- Next are the central momenta of the HMS and SHMS, followed by the mass of the particle each arm should detect (the leading letter indicates which arm: p = SHMS, h = HMS).
- The momentum values should ALWAYS be entered as positive values, regardless of the spectrometer polarity
- Leave the helicity frequency as is
- The HMS and SHMS RF offsets are to centre the RF timing distributions
- The SHMS offset should be chosen such that pions are centred at 2
- The eHadCoinTime_Offset should be chosen such that the coincidence time for pions is centred at 0
- Don't worry about setting this precisely immediately, it can be corrected for in subsequent analysis trivially
- You can also add a comment line (start the comment line with a hash - #) before the run numbers to explain what the block is for
- An example of what this looks like when done correctly can be seen below -
After 50,000 events have been taken
- We run two scripts to check the detectors.
- Type ./run_coin_shms.sh to automatically replay the most recent run and launch the online replay GUI.
- Type ./run_coin_hms.sh to repeat the process for HMS detectors.
- For reference, all histos are saved in the HISTOGRAMS/Analysis/50k subdirectory. A copy of the scaler report is in REPORT_OUTPUT/Analysis/50k.
- Compare with the histograms in the golden run binder, make an elog entry if you notice any major differences
- You should also make a log entry if you notice any consistent trends on the plots over your shift
Adjusting the HMS Optical Matrix
- For this run period, the HMS will be used at very high central momentum, well beyond the saturation point for most of the spectrometer's magents
- When running at 6.803 GeV/c central momentum in the HMS, shift workers should set the replays to point to a different optical matrix
- From hallc_replay_lt, open the param file PARAM/HMS/GEN/hcana.param
- Use ";" to comment out the line "h_recon_coeff_filename = 'DATFILES/hms_recon_coeff_opt2018.dat'"
- Remove the ";" on the line "h_recon_coeff_filename = 'DATFILES/hms_newfit_6_59.dat'", or add this line in if not present
- Ensure that the new optical matrix file is in the correct place at DATFILES/hms_newfit_6.59.dat
- If the file is not present, contact Jacob Murphy at jmurphy@jlab.org
- When data completion at 6.59 GeV/c central HMS momentum, reverse these changes to ensure the standard optical matrix (hms_recon_coeff_opt2018.dat) is used for the rest of the run period
After the run is over
- Once the run ends you need to execute an analysis script.
- The script is - run_pionLT.sh located in /home/cdaq/hallc-online/hallc_replay_lt (you should be in this folder already)
- This script requires three arguments -
- Run number - This must be a positive integer, specify the run you want to analyse
- Run type - You must enter one of - Prod - Lumi - HeePSing -HeePCoin - Optics , the argument is case sensitive
- Target - You must enter one of - LH2 - LD2 - Dummy10cm - Carbon0p5 - Optics1 - Optics2 - CarbonHole , again, the argument is case sensitive
- The script will prompt you to re-enter the arguments if anything is not correct, hit ctrl+c at any time to exit the script
- Specify the run type and target as dictated by the run plan
- Depending upon the run type specified, the script will call the relevant analysis script, details on the individual scripts are provided in a separate section
- run_pionLT.sh will print to screen the path of the script it is trying to execute
- Generally, all of the scripts called will execute a replay, and then some subsequent analysis scripts
- Once they complete, the script will fill the run list with relevant info, follow the onscreen prompts
PionLT Production Script
Plots
When a production replay is complete it will output a pdf file to OUTPUT/Analysis/PionLT, which contains the following:
Page 1 - Kinematic Distributions
Q2 vs W Plot
- Q2 vs W with diamond cut applied
- Q2 and W values should match run plan for current setting
- Should see clear diamond cut in histogram
- Tag an expert if nothing is showing; limits will need to be adjusted
Epsilon Plots
- Epsilon values for the run
- Epsilon peak should match run plan for current kinematic
t vs phi Plots
- Polar plot of t vs phi
- Events should be concentrated to either side or about the middle (as shown above) of the polar plot
- Phi value of events corresponds to SHMS angle setting for kinematic set with larger angles to the left and smaller angles to the right
- Not all Q2 kinematic sets have lower angle setting. Check runplan if unsure
- Phi value of events corresponds to SHMS angle setting for kinematic set with larger angles to the left and smaller angles to the right
- Events should be concentrated to either side or about the middle (as shown above) of the polar plot
Missing Mass Plots
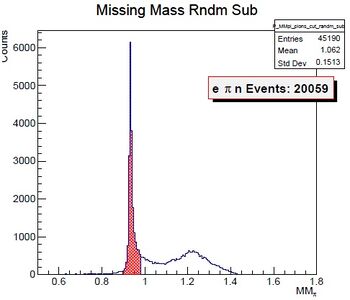
- Missing mass with an integral over the peak at the nucleon mass
- Missing mass peak should be at nucleon mass
- IMPORTANT: Integral of number of events in the peak should be displayed in red-outlined box
- If no peak is shown, then the standard.kinematics file is not set or set incorrectly for the run
Page 3 - Electron-Pion Acceptance Distributions
HMS Standard Cut Plots
- HMS x', y', and delta with acceptance, RF, and PID cuts applied in blue
- Tag expert if abnormal peaks seen in plots
SHMS Standard Cut Plots
- SHMS x', y', and delta with acceptance, RF, and PID cuts applied in blue
- Tag expert if abnormal peaks seen in plots (like peak in delta plot above)
Page 4 - Electron-Pion Calorimeter Distributions
HMS Cal Plots
- [left] HMS calorimeter etotracknorm with acceptance, RF, and PID cuts applied in blue.
- [right] HMS calorimeter etotracknorm vs npesum for the HMS cerenkov
SHMS Cal Plots
- SHMS calorimeter etotracknorm with acceptance, RF, and PID cuts applied in blue.
Page 5 - Electron-Pion RF Distributions
SHMS RF Plots
- For beam bunch spacing is of 4ns.
- SHMS RF time before cuts (red) and after acceptance, RF, and PID cuts (blue)
- For beam bunch spacing is of 2ns.
- SHMS RF time before cuts (red) and after acceptance, RF, and PID cuts (blue)
- If RF peak near to 2, either update RF offset or tag an expert
- SHMS RF time before cuts (red) and after acceptance, RF, and PID cuts (blue)
SHMS RF vs Missing Mass Plots
- SHMS RF vs Missing Mass, before (left) and after (right) cuts. (for 4ns beam bunch spacing)
- Pion events correspond to the large RF peak
- Kaon events in clump at lower RF in first figure above, and should be cut out in second figure
- Neutron/proton events in strong band at MM=0.9
- Make sure these events are not removed from cuts
- Pion events correspond to the large RF peak
- SHMS RF vs Missing Mass, before (left) and after (right) cuts. (for 2ns beam bunch spacing)
- Pion events correspond to the large RF peak
- Kaon events in clump at lower RF in first figure above, and should be cut out in second figure
- Neutron/proton events in strong band at MM=0.9
- Make sure these events are not removed from cuts
- Pion events correspond to the large RF peak
Page 6 - Electron-Pion Aero/HGC/NGC PID Distributions
Cerenkov Detectors with Different Particles
- The table below overviews what particles are detected by which Cerenkovs
| Particle | NGC | HGC | Aero |
| e | YES | YES | YES |
| pi | NO | YES | YES |
| k | NO | NO | YES |
| p | NO | NO | NO |
SHMS HGC/aero/NGC Cerenkov Plots
- npe sum for aerogel Cerenkov, NGC and HGC before (red) and after (blue) cuts
Page 7 - SHMS HGC vs Aero Cerenkov vs NGC Plots
- npe sum aerogel Cerenkov vs HGC and pe sum NGC vs HGC and pe sum NGC vs aerogel Cerenkov, before (left) and after (right) cuts
Page 8 - Electron-Pion Coin Time/Missing Mass Distributions
Electron-Pion Coin-Time Plots
- Coin Time for Electron-Pion before (left) and after (right) cuts
- Large peak should be at 0
- If not, coin-time offset should be adjusted in database file for run, or in python script
- Ensure prompt (pink) peak aligns with large peak
- ensure random cuts (green) align with 3 small peaks on either side of prompt peak
- Large peak should be at 0
Missing Mass Plots
- Missing mass before (left) and after (right) cuts
- Large missing mass peak should be at nucleon mass
- Ensure after cuts noise is reduced and prompt peak is aligned correctly with the large peak at nucleon mass
Missing Mass vs Beta Plots
- Missing Mass vs beta before (left) and after (right) cuts
- Beta should be at 1
Page 9 - Electron-Pion Coin Time vs Missing Mass Distributions
Coin Time Beta Plots
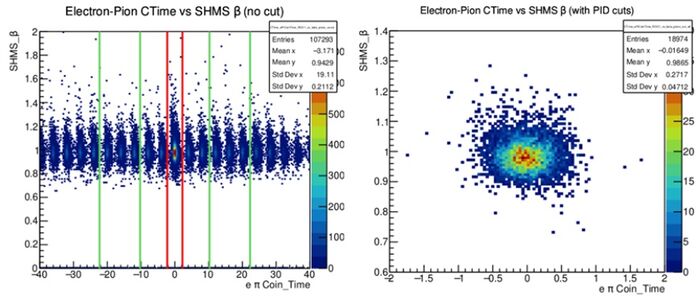
- Electron-Pion Coin time vs beta before (left) and after (right) cuts
- Beta should be at 1
- Ensure random cuts (green) are covering 3 coin-time peaks at either side of the prompt peak (red) at Coin time of 0
Coin Time vs Missing Mass Plots
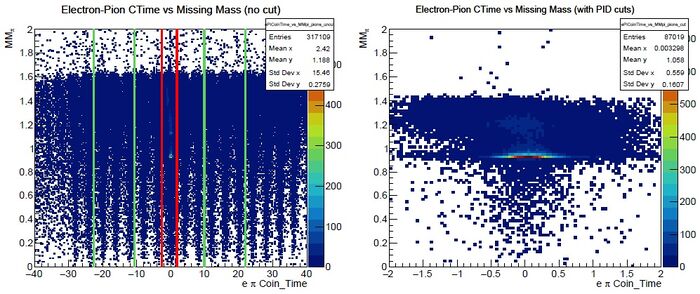
- Electron-Pion Coin time vs missing mass before (left) and after (right) cuts
- Again ensure random cuts (green) are covering 3 coin-time peaks at either side of the prompt peak (red) at Coin time of 0
- After cut should see missing mass peak at nucleon mass
- Ensure this strip is not cut-off
Page 10 - Delta vs Beta Distributions
HMS Delta vs HMS Beta Plots
- HMS Delta vs HMS Beta before (left) and after (right) cuts
SHMS Delta vs SHMS Beta Plots
- SHMS Delta vs SHMS Beta before (left) and after (right) cuts
Page 11 - HMS X_fp/Y_fp vs HMS Beta Distributions
HMS X_fp vs HMS Beta Plots
- HMS X_fp vs HMS Beta before (left) and after (right) cuts
HMS Y_fp vs HMS Beta Plots
- HMS Y_fp vs HMS Beta before (left) and after (right) cuts
Page 13 - SHMS Calorimeter y vs x Distributions
SHMS Calorimeter y vs x Plots
- SHMS Calorimeter y vs x before (left) and after (right) cuts
Debugging
- For information on how to adjust the cuts, see here
- Physics plots looking odd are likely due to timing cuts not being set correctly
- If there are warnings or prompts that files aren't being found, read them and check if they're true
- For example if it complains /This/Is/My/Path/To/File.txt doesn't exist, just do - ll /This/Is/My/Path/To/File.txt
Luminosity Script
Plots
Debugging
HeeP Singles Script
Plots
Debugging
HeeP Coin Script
Plots
Debugging
Optics Script
Plots
Debugging
Debugging - General
If any of the plots look odd/not as described, you should -
- Double check that standard.kinematics has been updated and is CORRECT, verify that when you start the replay the values you THINK it is reading appear in the hcana initiation info dump. See the images below -
- Watch out for silly typos, e.g. gbeam rather than gpbeam.
- Note that standard.kinematics affects things you think it really shouldn't! If things look wrong this is absolutely the first thing you should check.
- Make sure you have the correct particles going into each spectrometer
You should not -
- Panic
- Start editing scripts and deleting things without knowing what you are adjusting
- Delete ANYTHING in the scripts without also leaving a comment explaining what you have deleted or changed


